Step by step guide to set up a Local AEM Development Environment
Category: Adobe Experience Manager (AEM) Posted:May 21, 2020 By: Alvera Anto
This article is a guide to establish a local advancement for Adobe Experience Manager(AEM). We intend to cover essential subjects of local installment, Apache Maven, integrated development environment, and debugging/troubleshooting. Development with #, CRXDE Lite, Visual Studio Code, and IntelliJ will be discussed.
Overview
Setting up a local development environment is the very first step when establishing an Adobe Experience Manager or AEM. Invest an ample amount of time to establish a high-quality development environment to increase your performance and write better and quicker code. We can break an AEM local development environment into four areas:
- Local AEM instances
- Apache Maven project
- Integrated Development Environment (IDE)
- Troubleshooting
Install local AEM Instances.
When we describe a local AEM scenario, we are speaking about a copy of Adobe Experience Manager that is running on a developer’s system. All AEM development must begin by writing and running code against local AEM circumstances.
If you are new to AEM, two basic run settings can be installed: Author and Publish. The Author’s run mode is the environment that digital marketing experts will make use of to create and also handle the content. When developing the majority of the time you will be releasing code to an Author instance. This permits you to create new pages, include, and setup elements. AEM Sites is a WYSIWYG authoring CMS and for that reason, most of the CSS, and JavaScript, can be tested versus authoring circumstances.
It is also a vital test code against a local Publish instance. The Publish scenario is the AEM environment that visitors to your website will connect with. While the Publish instance is the same technology stack as the Author instance, there are some major differences between configurations and approvals. The code should constantly be examined against a local Publish instance before being promoted to higher-level environments.
Steps.
1.Make sure Java is set up.
Prefer Java JDK 11 for AEM 6.5+.
Java JDK 8 for AEM versions before AEM 6.5.
2. Get a copy of AEM QuickStart Jar and a [license.properties]
3. Create a folder structure in your computer system like the following:
~/aem-sdk
/author
/publish
4. Relabel the # JAR to aem-author-p4502. jar and place it beneath the/ author directory. Include the license.properties submit below the/ author directory site.
5.Make a copy of the QuickStart JAR, rename it to aem-publish-p4503. jar and place it beneath the/ publish directory. Add a copy of the license.properties file beneath the/ publish directory.
~/aem-sdk
/author
+ aem-author-p4502.jar
+ license.properties
/publish
+ aem-publish-p4503.jar
+ license.properties
6. Double-click the aem-author-p4502. jar data to set up the Author instance. This will certainly start the author instance, running on port 4502 on the local computer.
Double-click the aem-publish-p4503. jar file to set up the Publish instance. This will certainly start the Publish instance, operating on port 4503 on the local computer.
NOTE: Depending on your development machine’s hardware it might be hard to have both an Author and Publish instances operating at the same time. Rarely do you require to run both simultaneously on a local setup.
Install Apache Maven
Apache Maven is a tool to handle the building and deployment of Java-based projects. AEM is a Java-based system and Maven is the standard method to handle code for an AEM job. When we say AEM Maven Project or just your AEM Task, we are describing a Maven project that includes all the customized code for your website.
All AEM projects must be developed off the latest version of the AEM Project Archetype . The AEM Project Archetype will create a bootstrap of an AEM task with some example code and content. The AEM Project Archetype also consists of AEM WCM Core components configured to be used on your project.
CAUTION: When beginning a new task it is an ideal method to use the most recent version of the archetype. Bear in mind that there are multiple versions of the archetype and not all versions work with older versions of AEM.
Steps.
1.Download And Install Apache Maven.
2. Set Up Apache Maven and ensure that the installation has been contributed to your command-line COURSE. macOS customers can install Maven utilizing Homebrew.
3. Confirm that Maven is installed by opening a new command line terminal and implementing the following:
$ mvn –version
Apache Maven 3.3.9
Maven home: /Library/apache-maven-3.3.9
Java version: 1.8.0_111, vendor: Oracle Corporation
Java home: /Library/Java/JavaVirtualMachines/jdk1.8.0_111.jdk/Contents/Home/JRE
Default locale: en_US, platform encoding: UTF-8
4. Add the adobe-public profile to your Maven settings.xml file to automatically include repo.adobe.com to the Maven build process.
5. Create a file named settings.xml at ~/. m2/settings. XML if it doesn’t exist currently.
6. Add the adobe-public profile to the settings.xml file based upon the directions below.
An example settings.xml is listed below.
Note, the naming convention of settings.xml and the positioning beneath the users. m2 directory site is very important.
<settings xmlns=”https://maven.apache.org/SETTINGS/1.0.0″
xmlns:xsi=”https://www.w3.org/2001/XMLSchema-instance”
xsi:schemaLocation=”https://maven.apache.org/SETTINGS/1.0.0
https: //maven.apache.org/xsd/settings-1.0.0.xsd”>
<profiles>
<!– ====================================================== –>
<!– A D O B E P U B L I C P R O F I L E –>
<!– ====================================================== –>
<profile>
<id>adobe-public</id>
<activation>
<activeByDefault>true</activeByDefault>
</activation>
<properties>
<releaseRepository-Id>adobe-public-releases</releaseRepository-Id>
<releaseRepository-Name>Adobe Public
Releases</releaseRepository-Name>
<releaseRepository-URL>https://repo.adobe.com/nexus/content/groups/public</releaseRepository-URL>
</properties>
<repositories>
<repository>
<id>adobe-public-releases</id>
<name>Adobe Public Repository</name>
<url>https://repo.adobe.com/nexus/content/groups/public</url>
<releases>
<enabled>true</enabled>
<updatePolicy>never</updatePolicy>
</releases>
<snapshots>
<enabled>false</enabled>
</snapshots>
</repository>
</repositories>
<pluginRepositories>
<pluginRepository>
<id>adobe-public-releases</id>
<name>Adobe Public Repository</name>
<url>https://repo.adobe.com/nexus/content/groups/public</url>
<releases>
<enabled>true</enabled>
<updatePolicy>never</updatePolicy>
</releases>
<snapshots>
<enabled>false</enabled>
</snapshots>
</pluginRepository>
</pluginRepositories>
</profile>
</profiles>
<activeProfiles>
<activeProfile>adobe-public</activeProfile>
</activeProfiles>
</settings>
7. Verify that the adobe-public profile is active by running the following command:
$ mvn help:effective-settings
…
<activeProfiles>
<activeProfile>adobe-public</activeProfile>
</activeProfiles>
<pluginGroups>
<pluginGroup>org.apache.maven.plugins</pluginGroup>
<pluginGroup>org.codehaus.mojo</pluginGroup>
</pluginGroups>
</settings>
[INFO] ————————————————————————-
[INFO] BUILD SUCCESS
[INFO] –———————————————————————–
[INFO] Total time: 0.856 s
If you do not see the adobe-public it is an indication that the Adobe repo is not effectively referenced in your ~/. m2/settings. XML data. Please take another look at the earlier steps and validate that the settings.xml documents reference the Adobe repo.
Establish an Integrated Advancement Setting
An integrated development environment or IDE is an application that incorporates a full-screen editor, syntax support, and build-tools. Relying on the kind of development you are doing, one IDE may be better over another. Regardless of the IDE, it will certainly be necessary to be able to regularly push code to a local AEM instance to check it. It will also be important to periodically pull configurations from a local AEM instance into your AEM task to continue to a source-control administration system like Git.
Eclipse IDE
The [Eclipse] IDE is one of the preferred IDEs for Java development, in large part because it is open source and free! Adobe provides a plugin, [AEM Developer Tools], for Eclipse to enable simpler development with a good GUI to integrate code with local AEM circumstances. The Eclipse IDE is recommended for developers new to AEM in huge part as a result of the GUI support by AEM Developer Tools.
Installation and Set-Up.
Download and install the Eclipse IDE for Java EE Developers
Follow the instructions to set up the AEM Designer Tools plugin .
IntelliJ Concept
The IntelliJ IDEA is an effective IDE for professional Java development. IntelliJ IDEA comes in two variations, a free community version, and a commercial (paid) Ultimate version. The free Community version of IntelliJ IDEA is sufficient for AEM development, nonetheless the Ultimate expands its capacity set.
Installation and Setup
Download and install the IntelliJ IDEA
Set up Repo (command-line tool)
Visual Studio Code
Visual Studio Code has quickly become the preferred tool for most front-end developers with improved JavaScript support, Intellisense, and browser debugging support. Visual Studio Code is open resource, free, with many effective extensions. Visual Studio Code can be set up to integrate with AEM with the help of an Adobe device, repo. Several community-supported extensions can be set up to integrate with AEM.
Visual Studio Code is a fantastic choice for front-end developers who will be creating CSS/LESS and JavaScript code to develop AEM client libraries. This tool might not be the most effective choice for new AEM developers given that node definitions(dialogues, components) will certainly require to be modified in raw XML. There are numerous Java extensions available, however, if primarily doing Java development Eclipse IDE or IntelliJ might be preferred.
Important links
Download the Visual Studio Code.
repo – FTP-like tool for JCR web content.
aemfed – Quicken your AEM front-end operations.
AEM Sync – Community sustained * extension for Visual Studio Code.
CRXDE Lite
CRXDE Lite is a browser-based view of the AEM repository. CRXDE Lite is embedded in AEM and permits a designer to do standard development tasks like editing and enhancing files, specifying elements, dialogues, and templates. CRXDE Lite is not meant to be a full development setting yet is extremely reliable as a debugging tool. CRXDE Lite serves when expanding or merely recognizing product code beyond your codebase. CRXDE Lite provides a powerful view of the repository and a way to effectively check and manage permissions.
CRXDE Lite should constantly be utilized in conjunction with other IDEs to evaluate and debug code but never as the key development tool. It has restricted phrase structure support, no auto-complete abilities, and minimal integration with source control management systems.
Troubleshooting
Help! My code isn’t functioning! Similar to all development, there will certainly be times (most likely many), where your code is simply not functioning as expected. AEM is an effective platform, but with great power … comes terrific intricacy. Below are a few high-level starting points when it comes to fixing and tracking down problems(yet far from an extensive listing of points that can go wrong):.
Verify Code deployment
A good first step, when experiencing a problem is to confirm that the code has actually been released and installed efficiently to AEM.
- Examine Bundle Manager to make sure that the code package has been submitted and set up. Inspect the time stamp to validate the bundle has been set up recently.
- If doing incremental data updates using a tool like Repo or AEM Developer Tool, check CRXDE Lite that the file has been pushed to the local AEM instance and that the file components are updated.
- Inspect whether the bundle is uploaded if facing any problems related to Java code in an OSGi package. Open the Adobe Experience Manager Web Console and search for your bundle. Ensure that the package has an Active standing. See below for more information on troubleshooting a bundle in the installed state
Check the Logs
AEM is a chatty system and logs a lot of beneficial data in the error.log. The error.log can be discovered where AEM has been installed: < AEM-installation-folder >/ CRX-quickstart/logs/error. log.
A useful method for finding issues is to include log statements in your Java Code:
import org.slf4j.Logger;
import org.slf4j.LoggerFactory;
…
public class MyClass {
private final Logger log = LoggerFactory.getLogger(getClass());
…
String myVariable = “My Variable”;
log.debug(“Debug statement of myVariable {}”, myVariable);
log.info(“Info statement of myVariable {}”, myVariable);
}
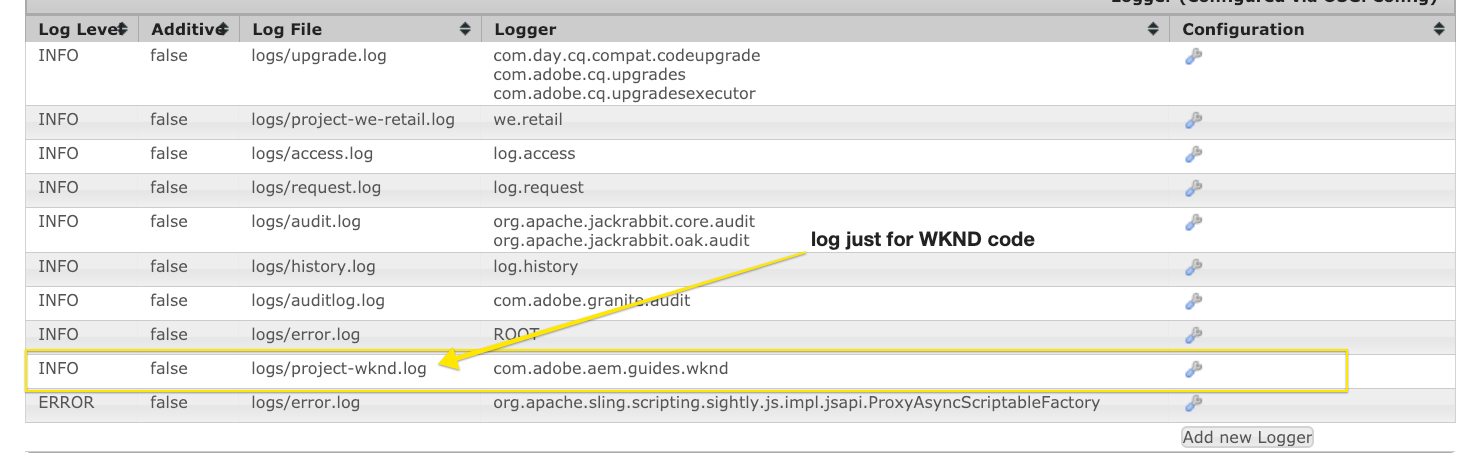
By default, the error.log is configured to log INFO statements. If you intend to change the log level you can do so by going to Log Support.You might also locate that the error.log is also chatty. You can use the Log Support to configure log statements for just a specified Java plan. This is an ideal technique for projects, to conveniently separate custom-made code issues from OOTB AEM system issues.
The bundle is in an Installed state
All packages (excluding Fragments) should remain in an Active state. If you see your code bundle in the installed state then there is a problem that issues that must be fixed. Many times this is a dependency concern:
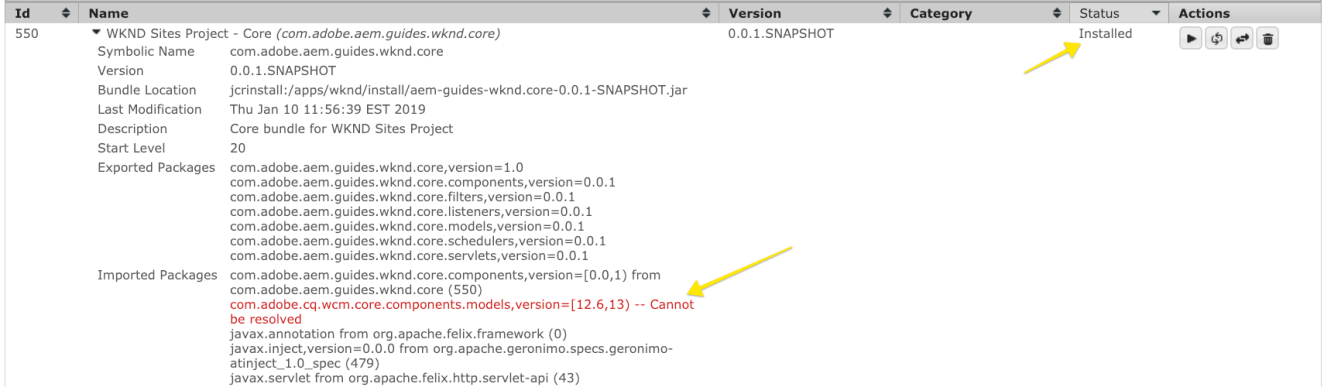
In the above screenshot, the WKND Core bundle is in the installed state. This is because the bundle is expecting a different version of com.adobe.cq.wcm.core.components.models than the one that is readily available on the AEM instance.

A useful tool that can be used is the Dependency Finder. Include the Java package name to check what variation is offered on the AEM circumstances:
Proceeding with the above example, we can see that the version set up on the AEM circumstances is 12.2 vs 12.6 that the bundle was expecting. From there you can function backward and see if the Maven dependency on AEM matches the Maven dependencies in the AEM project. In the above instance, Core Components v2.2.0 is installed on the AEM instance but the code bundle was built with a dependency on v2.2.2, this is the reason for the dependency problem.
Validate Single model Registration
AEM components must constantly be backed by a Single Model to encapsulate any kind of service reasoning and ensure that the HTL providing manuscript remains clean. If experiencing issues where the Sling Model can not be discovered it might be handy to examine the Sling version from the console. This will certainly inform you if your Sling Version has been signed up and which source type (the component course) it is linked to.

Shows the registration of a Sling model, BylineImpl that is tied to a component source sort of wknd/components/content/ byline.
CSS or JavaScript Issues
For the majority of CSS and JavaScript issues, making use of the browser’s development tools is the most efficient method to troubleshoot. To narrow down the issue when developing against an AEM author instance it is useful to view the page “as Published”.
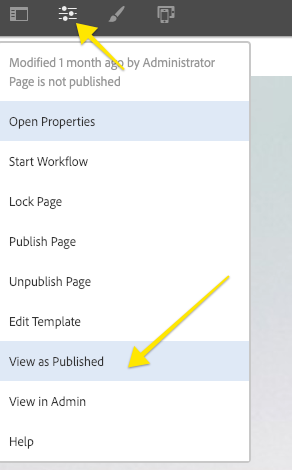
Open Up the Page Feature menu selection and click View as Published. This will certainly open up the page without the AEM editor and with an inquiry, parameter readied to wcmmode=disabled. This will successfully disable the AEM authoring UI and make troubleshooting/debugging front-end problems much easier.
An additional commonly experienced problem when developing front-end code is old or outdated CSS/JS being filled. As a first step, ensure the browser history has been cleared and if necessary, start an incognito browser or fresh session.
Debugging Customer Libraries
With different approaches of categories and embeds to add multiple client libraries, it can be cumbersome to repair. AEM reveals several tools to help with this. One of the most important tools is to Rebuild Client Libraries which will certainly follow AEM to re-compile any LESS data and create the CSS.
Dump Libs – Lists every one of the customer libraries signed up in the AEM instance. <host>/ libs/granite/ui/ content/dumplibs. html.
Test Output- allows a customer to see the anticipated HTML result of clientlib includes based upon the category. <host>/ libs/granite/ui/ content/dumplibs. test.html.
Libraries Dependency Validation- highlights any type of dependencies or ingrained classifications that can not be found. <host>/ libs/granite/ui/ content/dumplibs. validate.html.
Rebuild Client Libraries – allows an individual to force AEM to restore every one of the customer libraries or revoke the cache of customer libraries. This tool is specifically effective when establishing with LESS as this can force AEM to re-compile the produced CSS. As a whole, it is more effective to Revoke Caches and thereafter carry out a web page refresh versus rebuilding all of the libraries. <host>/ libs/granite/ui/ content/dumplibs. rebuild.html.
NOTE: If you are constantly revoking the cache using the Rebuild Client Libraries tool it may be worth doing a one time rebuild of all customer libraries. This might take around 15 mins, however, it commonly gets rid of any type of caching problem in the future.
Bottomline
I hope this guide helps you set up local AEM Development Environmentseamlessly. If you’re looking for more such elaborate and informative articles, visit our website.
Also, at ZaranTech we offer an online training program on AEM. If you’re planning to make a career in this field, you’re in the right place. We offer a self-paced training program conducted by experienced and renowned SMEs present in the industry. Feel free to browse through our course page. Happy learning!


 99999999 (Toll Free)
  +91 9999999